

Why use a Raspberry pi when i already have a working TCP-server on my PC?
Easy answered:- I do not like to have my PC up and running 24-7 due to the facts that it's noisy (stationed in my bedroom)
- The RPi takes much less energy (runs on a 1000mA cellphone charger)
- I don't need any other parts other than a RPi, a nRF24L01(+) and cables, since the RPi has a 3,3V power supply!
Setting up SPI on RPi
First of all, you must have a working copy of raspbian, I use Wheezy (made a small tutorial in how to set it up). The RPi has a built in hardware SPI, which we first has to get up and running according to this guide, and here is how i did it:
Start a terminal like the LXTerminal and follow these commands:
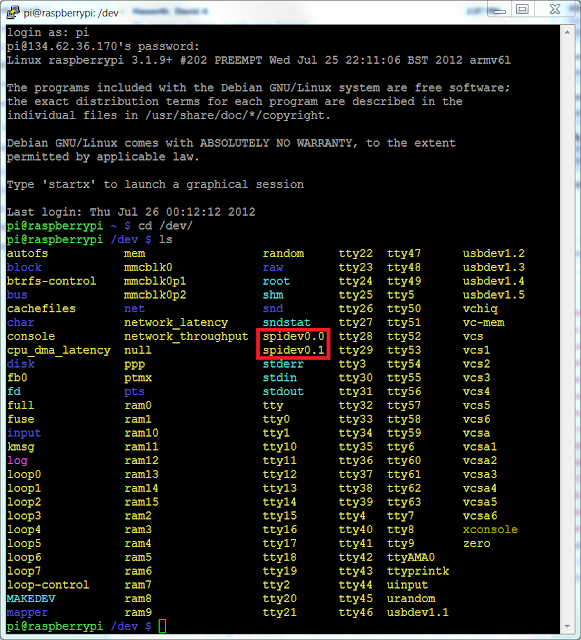
To check if the SPI is working (optional) you can connect the mosi-pin to the miso-pin (GPIO10 and 9, see picture), and run the commands in a terminal:
Start a terminal like the LXTerminal and follow these commands:
To check if the SPI is working (optional) you can connect the mosi-pin to the miso-pin (GPIO10 and 9, see picture), and run the commands in a terminal:


Quick2Wire
Quick2Wire is a tool that makes it possible to control the GPIO and the SPI via python. We need to install quick2wire, download the quick2wire python plugin (API) and gain root access to the spi.
Start by downloading the plugin from there website. Extract the zip-file by right clicking and unzip. Now open a terminal window and change directory so that you are in the extracted folder called "quick2wire-gpio-admin-master" then enter the following commands:
Start by downloading the plugin from there website. Extract the zip-file by right clicking and unzip. Now open a terminal window and change directory so that you are in the extracted folder called "quick2wire-gpio-admin-master" then enter the following commands:
Now log out from the RPi and back in again. The power button at the bottom right quorner has the option to log out. Log back in by typing your username "pi"/enter, then your code "raspberry"/enter...
To gain root access for the SPI so that you dont have to use the "sudo" command in front of every bit of code, I followed this guide, which tells you to do this:
Finnish by remove and reattach the power cable to restart.
Python 3
Now it's time to install python3 which is needed to run the code. Open a terminal and run these commands:Now to use quick2wire with python, you need the python API which can be downloaded from this site. Download it, and unpack it to a location on you SD-card (no installation required!)
Setting up the hardware
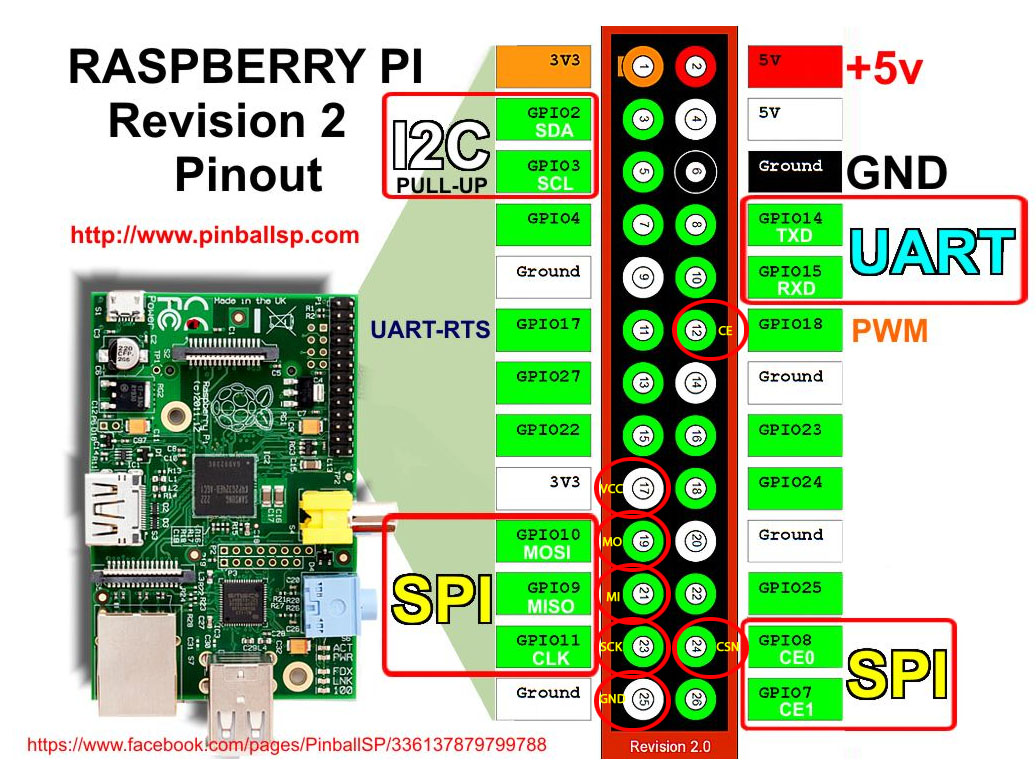
The setup is very straight forward. Connect the wires like this (see red circles in the picture):
RPi GPIO9 (Pin 21) to RF ( MISO )
RPi GPIO10 (Pin 19) to RF ( MOSI )
RPi GPIO11 (Pin 23) to RF ( SCK )
RPi GPIO8 (Pin 24) to RF ( CSN )
RPi GPIO18 (Pin 12) to RF ( CE )
RPI 3.3V (Pin 17) to RF ( VCC/3.3V )
RPi Gnd (Pin 25) to RF (GND)
(IRQ-pin on nRF is not used in this example)
nRF24L02+ (top view)RPi GPIO9 (Pin 21) to RF ( MISO )
RPi GPIO10 (Pin 19) to RF ( MOSI )
RPi GPIO11 (Pin 23) to RF ( SCK )
RPi GPIO8 (Pin 24) to RF ( CSN )
RPi GPIO18 (Pin 12) to RF ( CE )
RPI 3.3V (Pin 17) to RF ( VCC/3.3V )
RPi Gnd (Pin 25) to RF (GND)
(IRQ-pin on nRF is not used in this example)

nRF24L01 (only one of each VCC and GND-pin has to be connected!)

I think the CE-pin should work on a different pin (it would be convenient to put it on GPIO25) since it doesn't have anything to do with the SPI, but I haven't tried that yet...
The python programs
I got the basic nrf python code from this program (plus a lot of help with the steps above) from Jussi Kinnunen, all creds to him!Download my version of the program, as well as my TCP-server program. which is well commented to make it easy to understand. You see the codes below:
nRF24L01p.py
TCP_Server.py
To run the program, create a third file, and name it to something like "a.sh", the ending "sh" means shell file, which is runnable. Fill the file with these commands:
(change the path "/home/pi/" to where you have the quick2wire-folder!)
This will make sure the path is imported every time the script is run! If anyone knows how to permanently add the path, please tell me in the comment field!
To run the program, all you have to do now is to set the working path in the terminal to where you store the a.sh-file with the cd-command and type
This is a screenshot from the code running in the terminal:

As you can see, the program starts by asking if you want to run it as "rx" (Receiver) or "tx" (transmitter). I chose transmitter by typing "tx"/enter.
Then it prints out all the registers that the code changes (or sets) and then starts a server loop in a background thread (TCP).
When this is done the program waits for either the user to type in data to send (3 bytes in my example), or for a command from the TCP-server.
In the picture above, you can see that i started by typing "123" on the keyboard, which was sent to the nRF and broadcasted to any nRF-receiver with address 0x12. As you can see the STATUS register after the broadcast tells me that the transmission failed (0x1E), since i don't have a receiver running at the moment... a working transmission would give the result "0x2E" (when the EN_AA is turned on)!
The second thing I did was to send the command "300" to the TCP-server from my home-made android application (can be sent form any TCP-client with the right port number). The TCP-server then calls the nRF24L01p.py and transmits the data like it was inputted with the keyboard.
If a (large) error shows up when you try to run the code, which tells you something about "cannot export the pin number 18 because it is already exported", run the following command in the terminal:
If an error shoes up that tells you that the address is occupied, the TCP-server has not closed yet, and you have to sit down and wait for up to 1min before you try again (I know you can change this timing, but haven't come so far)
If you have any questions or just want to tell me what you think of the blog, just give me a comment in the comment field underneath...
/Kalle


