Monday, December 2, 2013

AndroidPlot in AndroidApp

This will be a simple step by step tutorial in how i managed to get the AndroidPlot up and running in one of my android apps.

The creators of the function has a great tutorial on there website (allot of code is straight from there tutorial), but as always they assumed i had more knowledge than i do to get it working straight away... Since it wasn't enough to follow there steps, and i had to spend allot of time searching the internet for answers i figured i would post a step by step tutorial on how i managed to get it up and running.

1. Download the latest version of the "Core Library" .jar-file from there download page. (the only file you need to download)

2. Save the file into your "libs" folder, and it will automatically import the library under "Android Private Libraries" (if not, left click your project foldet/Properties/Java Build Path/ tab "Libraries" / "Add JARs"...)

3.Create folder res/"xml" which android recognizes as default xml-resources folder.

4. Create two xml-files, first one named "line_point_formatter_1.xml", and secound one whit "2" instead of "1"....

5. paste following code in the first xml-file: (you can put a linebreak in between every setting to get a better overview, but my code-viewer wouldn't let me...)
<?xml version="1.0" encoding="utf-8"?>

And this in the secound file:
<?xml version="1.0" encoding="utf-8"?>

6. Create a new xml file that you name "dimens.xml" and put in the res/values folder. Paste this in the file:
<?xml version="1.0" encoding="utf-8"?>


    16dp
    16dp
    10dp
    20dp
    13dp
    13dp
    15dp
    15dp
    20dp

7. Create a layout file in res/layout and name it something like "plotlayout.xml". Paste this code in the file:


8. Create a new .java-file in the src/"com.example.NAMEOFYOURPROJECT" (where most of the java-files are stored) and name the file "Plots.java"

9. Paste this in the file:
package com.androidplot.THENAMEOFYOURAPPLICATION;   //all in small case letters. 

import android.app.Activity;
import android.os.Bundle;
import com.androidplot.xy.*;
import java.util.Arrays;
 
/**
 * A straightforward example of using AndroidPlot to plot some data.
 */
public class Plots extends Activity
{
 
    private XYPlot plot;
 
    @Override
    public void onCreate(Bundle savedInstanceState)
    {
        super.onCreate(savedInstanceState);
 
        setContentView(R.layout.plotlayout); //The name of your plotlayout.xml-file!
 
        // initialize our XYPlot reference:
        plot = (XYPlot) findViewById(R.id.mySimpleXYPlot);
 
        // Create a couple arrays of y-values to plot:
        Number[] series1Numbers = {1, 8, 5, 2, 7, 4};
        Number[] series2Numbers = {4, 6, 3, 8, 2, 10};
 
        // Turn the above arrays into XYSeries':
        XYSeries series1 = new SimpleXYSeries(
                Arrays.asList(series1Numbers),          // SimpleXYSeries takes a List so turn our array into a List
                SimpleXYSeries.ArrayFormat.Y_VALS_ONLY, // Y_VALS_ONLY means use the element index as the x value
                "Series1");                             // Set the display title of the series
 
        // same as above for series 2
        XYSeries series2 = new SimpleXYSeries(Arrays.asList(series2Numbers), SimpleXYSeries.ArrayFormat.Y_VALS_ONLY, "Series2");
 
        // Create a formatter to use for drawing a series using LineAndPointRenderer
        // and configure it from res/xml/config-files:
        LineAndPointFormatter series1Format = new LineAndPointFormatter();
        series1Format.setPointLabelFormatter(new PointLabelFormatter());
        series1Format.configure(getApplicationContext(),
                R.xml.line_point_formatter_1.xml);   //Name of the 1'st xml-config file
 
        // add a new series' to the xyplot:
        plot.addSeries(series1, series1Format);
 
        // same as above:
        LineAndPointFormatter series2Format = new LineAndPointFormatter();
        series2Format.setPointLabelFormatter(new PointLabelFormatter());
        series2Format.configure(getApplicationContext(),
                R.xml.line_point_formatter_2.xml);   //Name of the 2'nd xml-config file
        plot.addSeries(series2, series2Format);
 
        // reduce the number of range labels
        plot.setTicksPerRangeLabel(3);
        plot.getGraphWidget().setDomainLabelOrientation(-45);
 
    }
}

10. Add these lines to the "Manifest file" (found in the root, and named "YOURAPPNAMEManifest.xml")

And put the lines in between these tags:
 and 

11. Now it's time to test the plot. create a button with an onClickListener whit this code in it:
Intent i = new Intent(getApplicationContext(), Plots.class);
startActivityForResult(i, 2);
which will start a new intent which call the Plots-class which in term opens the plotts-layout showing the graph of the numbers.
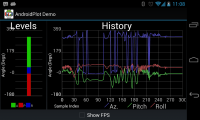
Now when you know how the file-system works, try next tutorial they have posted, which is a dynamically updated plot over the phones tilt... =)

Saturday, November 23, 2013

Autostart Raspberry pi VNC and server

Hi!
Last week i finally configured my Rpi, and had it setup as a server to get 24/7 access to all the gadgets in my apartment. I'm not very familiar with linux, and therefore it is probably a good ide to write down how i managed to do so, for future setups =)

First of all i wanted to get access to the Rpi from my main computer. I had two options, either just by a terminal (SSH), which is probably best for speed, or configure a remote desktop (VNC) to mirror the pi on my main computers screen. Since i'm not to familiar with the linux terminal, i figured i'd start off with the VNC like this...

Setting up remote desktop (VNC) on the Rpi using the program TightVNC according to this guide (skipped the SSH-part in the beginning):

Install the TightVNCServer on the Rpi like this:


Then try and start the server by entering: (change the resolution to the screen res where you are going to view the desktop)
The "1" is an ID, (you can start several different servers)
The program will now prompt for you to enter a password to get access to the remote desktop, set one!

There might be an permission issue, so to make sure that wont happen, do this:  (where "pi" is the username)

The VNC-server nr "1" can later be closed by typing:

Install TightVNC on Windows machine

Now that you have your VNC-server up and running, it is time to install the TightVNC-program on you main computer from there website:
2013-03-16_162457
When done, startup the TightVNC-Viewer (not the server), type in the IP-address and the ID that you specified on the pi and press "Connect". A good ide is to configure your router so that the ip of the Rpi never changes...

If the server is running, a prompt for the password will show up, enter it and a window with the Rpi-desktop will popup =)

If you make it full-screen, the way of getting out is by pressing alt+ctrl+shift+F.

Autostart VNC-server when Rpi boots

Next step is to get the server to start automatically when the Rpi starts up. There is no point of having a remote desktop if I every time the rpi starts have to have a keyboard, mouse and a screen attached to it to startup the server...

Create a file named tightvnc in the init.d folder, and open it in nano to edit its content:


Enter the following:
Press ctrl+x and y to exit and save.

Now we need to set permissions to the file to make it executable:

And the last thing we’re going to make is to update the rc.d file (which tracks which initilization scripts are in the /init.d/ folder):

Now it is time to test it: Reboot the Rpi:


And try connecting the ThightVNC-program on the main computer.

Autorun other scripts when Rpi boots

To autorun a script that doesn't need permissions when Rpi starts is a little easier. Take my nRF-server for instance:
Create (if not allready created) the folder


Then add a file with the ending ".desktop"  and edit it in nano:


Edit the file like this:
Where the importent stuff is the terminal=false (we want to start lxterminal), and the "Exec" that executes the script "sh /home/pi/a.sh" in the lxterminal, which is the script that starts the server...
Exit nano with ctrl+x and save (press y)

Now to make the .desktopfile executable:


Reboot the Rpi, and you can see that the lxterminal has started the NRF-server in an open terminal!

Monday, May 27, 2013

Raspberry pi: nRF24L01 and TCP

This time I will describe how I got a Raspberry pi (Wheezy) to work as a Python server that controls a RF-transmitter (nRF24L01). The server takes commands either from a TCP connection (internet) or via the keyboard, and broadcasts the data through the RF-transmitter to the receivers i have set up in my home automation system. See my other posts covering how to use the nRF with an AVR, and the construction of a  multi-functional remote control.


Why use a Raspberry pi when i already have a working TCP-server on my PC?

Easy answered:
  • I do not like to have my PC up and running 24-7 due to the facts that it's noisy (stationed in my bedroom)
  • The RPi takes much less energy (runs on a 1000mA cellphone charger)
  • I don't need any other parts other than a RPi, a nRF24L01(+) and cables, since the RPi has a 3,3V power supply!

Setting up SPI on RPi

First of all, you must have a working copy of raspbian, I use Wheezy (made a small tutorial in how to set it up). The RPi has a built in hardware SPI, which we first has to get up and running according to this guide, and here is how i did it:

Start a terminal like the LXTerminal and follow these commands:


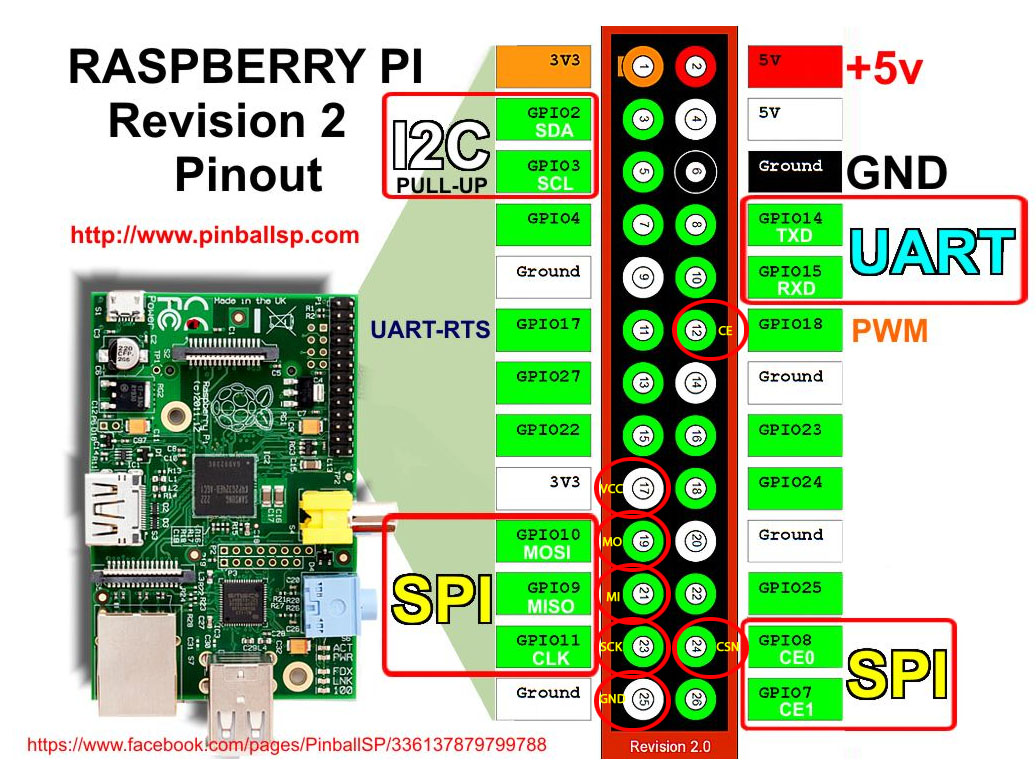
To check if the SPI is working (optional) you can connect the mosi-pin to the miso-pin (GPIO10 and 9, see picture), and run the commands in a terminal:


Quick2Wire

Quick2Wire is a tool that makes it possible to control the GPIO and the SPI via python. We need to install quick2wire, download the quick2wire python plugin (API) and gain root access to the spi.
Start by downloading the plugin from there website. Extract the zip-file by right clicking and unzip. Now open a terminal window and change directory so that you are in the extracted folder called "quick2wire-gpio-admin-master" then enter the following commands:


Now log out from the RPi and back in again. The power button at the bottom right quorner has the option to log out. Log back in by typing your username "pi"/enter, then your code "raspberry"/enter...

To gain root access for the SPI so that you dont have to use the "sudo" command in front of every bit of code, I followed this guide, which tells you to do this:


Finnish by remove and reattach the power cable to restart.

Python 3

Now it's time to install python3 which is needed to run the code. Open a terminal and run these commands:


Now to use quick2wire with python, you need the python API which can be downloaded from this site. Download it, and unpack it to a location on you SD-card (no installation required!)

Setting up the hardware

The setup is very straight forward. Connect the wires like this (see red circles in the picture):
RPi GPIO9     (Pin 21)    to RF  ( MISO )
RPi GPIO10   (Pin 19)    to RF  ( MOSI )
RPi GPIO11   (Pin 23)    to RF  ( SCK )
RPi GPIO8     (Pin 24)    to RF  ( CSN )
RPi GPIO18   (Pin 12)    to RF  ( CE )
RPI 3.3V        (Pin 17)    to RF  ( VCC/3.3V )
RPi Gnd         (Pin 25)    to RF  (GND)
(IRQ-pin on nRF is not used in this example)

nRF24L02+ (top view)


nRF24L01 (only one of each VCC and GND-pin has to be connected!)


I think the CE-pin should work on a different pin (it would be convenient to put it on GPIO25) since it doesn't have anything to do with the SPI, but I haven't tried that yet...

The python programs

I got the basic nrf python code from this program (plus a lot of help with the steps above) from Jussi Kinnunen, all creds to him!
Download  my version of the program, as well as my TCP-server program. which is well commented to make it easy to understand. You see the codes below:

nRF24L01p.py


TCP_Server.py


To run the program, create a third file, and name it to something like "a.sh", the ending "sh" means shell file, which is runnable. Fill the file with these commands:
(change the path "/home/pi/" to where you have the quick2wire-folder!)

This will make sure the path is imported every time the script is run! If anyone knows how to permanently add the path, please tell me in the comment field!

To run the program, all you have to do now is to set the working path in the terminal to where you store the a.sh-file with the cd-command and type


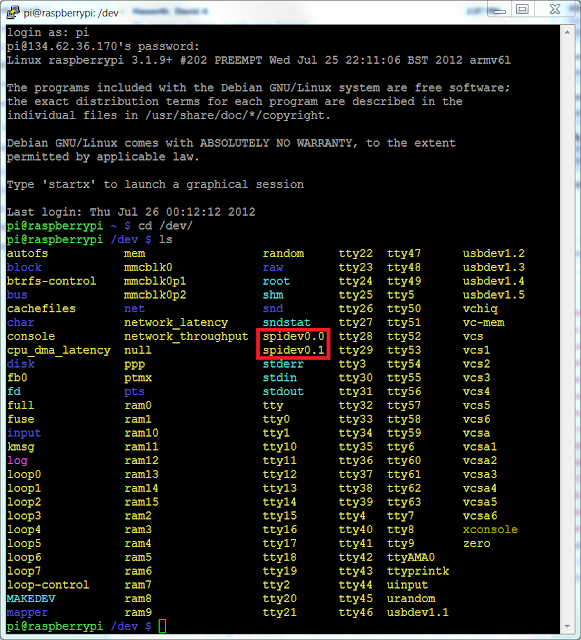
This is a screenshot from the code running in the terminal:


As you can see, the program starts by asking if you want to run it as "rx" (Receiver) or "tx" (transmitter). I chose transmitter by typing "tx"/enter.
Then it prints out all the registers that the code changes (or sets) and then starts a server loop in a background thread (TCP).
When this is done the program waits for either the user to type in data to send (3 bytes in my example), or for a command from the TCP-server.
In the picture above, you can see that i started by typing "123" on the keyboard, which was sent to the nRF and broadcasted to any nRF-receiver with address 0x12. As you can see the STATUS register after the broadcast tells me that the transmission failed (0x1E), since i don't have a receiver running at the moment... a working transmission would give the result "0x2E" (when the EN_AA is turned on)!

The second thing I did was to send the command "300" to the TCP-server from my home-made android application (can be sent form any TCP-client with the right port number). The TCP-server then calls the nRF24L01p.py and transmits the data like it was inputted with the keyboard.

If a (large) error shows up when you try to run the code, which tells you something about "cannot export the pin number 18 because it is already exported", run the following command in the terminal:


If an error shoes up that tells you that the address is occupied, the TCP-server has not closed yet, and you have to sit down and wait for up to 1min before you try again (I know you can change this timing, but haven't come so far)


If you have any questions or just want to tell me what you think of the blog, just give me a comment in the comment field underneath...
/Kalle

Setting up Raspbian on Raspberry pi

This is step by step how i installed Raspbian on my Raspberry pi:

  1. On a PC (or mac/linux, i will cover the PC-version) download the file "Raspbian Wheesy" from the website, using either a torrent program like utorrent or by the direct downloading-link.
  2. Extract the files to a folder on the computer, remember the location!
  3. Insert an SD-card in the computer, and make sure it contains nothing of value (since you will wipe all of its data later)
  4. (windows users) Download the program "Win32Diskmanager" from this site (green download button).
    1.  Extract the files to a folder, and open the file "Win32Diskmanager"
    2. In the program, press the blue folder-button and brows to the file you downloaded and extracted in step 1-2 (something like: "2013-05-12-wheeay-raspbian")
    3. Make sure it is the right SD-card in the "Device" tab, and press the "Write" button. (only takes a couple of minutes. 
  5. Move the SD-card to the Raspberry pi and connect:
    1. A mouse + keyboard
    2. HDMI-cable (to screen) 
    3. Network cable or wifi adapter
    4. Finnish by inserting the usb power adapter (at least 750mA)
  6. If you are having problems with the HDMI connection, unplug the USB-devices and restart the RPi (happens if you have a weak power supply!)
  7. The "Raspi-config" box shows up: 
  8. Start by arrow down to "expand_rootfs" and press enter
    1. Accept by pressing enter again. This setting makes sure the whole SD-card gets used, otherwise only 2GB will be visible to the system.
  9. Configure_keyboard (takes a while to load)
    1. Try to find a match in the list/enter
    2. Chose "other" at the very bottom/enter
    3. page down to your language/enter
    4. choose your language/enter
    5. Choose "The default for the keyboard layout"/enter
    6. choose "No compose key"/enter
    7. change this one to "<yes>"/enter (to enable the ctr+alt+backspace (like ctrl+alt+delete on windows))
  10.   Change_pass
    1. Pres "Ok" on window that pops up, (Change the standard password from "raspberry" to something else)
    2. Type new password/enter
    3. retype the same password/enter
  11. Change_local
    1. scroll down (or "page down") to your local (mine is "[] sv_SE.UTF-8 UTF-8") and press SPACE-key to put an "*" in the "[*]", finish with enter
    2. Choose your local in the list/enter (takes a while)
  12. Change_timezone
    1. Go to your timezone in the list (Europe)/enter
    2. Find a city nearby (Stockholm)/enter
  13. Overclock
    1. If you want to boost the RPi, its here! 
    2. I choose "modest", and it seem to work fine!
  14. Boot_behaviour
    1. confirm with yes (to skip the login-thing every time you boot up)
  15. Finnish by pressing right key twise to get to "<Finish>" and press Enter
    1. Press "Yes" to reboot
Now you should boot straight into Raspbian Wheesy, if not type your username ("pi"/enter) and your password ("raspberry"/enter if not changed), now type "startx"/enter to get to the desktop!
To get to the raspi-config again, open a terminal ("LXTerminal") and type "sudo raspi-config"/enter 


Thursday, April 11, 2013

Tutorial - USART and AVR

USART - a tutorial on how to setup a simple communication between the AVR chip and the computer!

In this tutorial i will go through the steps on how to get the USART on an Atmega88 to send and receive commands from and to the computer.

First of all you need the right hardware and software:

-Atmega88 - the microchip

-USB to COM-port adapter - this one works on windows 7 64 bit, mac and linux. (Drivers)

- Termite - a free windows program i used before i made my own (which i haven't yet decided if i should release or not). Anyway Termite has the capability of logging the correspondence to a file, and also has a timestamp function which is very useful!

Setup
You only need to connect three of the cables from the USB to COM adapter to the Atmega88.
Atmega88        COM adapter
   GND      =>       GND
   TXD       =>       TXD (PD1)
   RDX      =>        RXD (PD0)

USB 2.0 to TTL UART 6PIN Module Serial Converter CP2102 STC PRGMR Free cable


Then if you want to you can use either the 5 V or 3,3 V pin from the COM adapter to supply the power to the AVR.

Programming
I haven't put down a lot of work on this so it's probably not optimal, but i will show you how i got it to work:
I had problems when i used the chip on standard 1MHz, but it worked perfectly when changing to 8MHz, so i start by the includes like this:


Since the chip is fused to set the clock prescaler to a division of 8 (8MHz/8=1MHz) as factory default, i simply just change the prescaler back to "1" in code. This is accomplished by this little function: 


And the USART is initialized by calling this function

 To send a byte to the computer, use this function:


And to receive a byte from the computer:


Instead of constantly calling the USART_Receive-function, I strongly recommend you to setup an interrupt, that automatically triggers when the computer sends something to your chip. The interrupt is initialized like this:


And put the function that gets triggered by the USART receive interrupt at the very bottom of your code:


 Now here is the main function, that just waits for a USART command from the computer:


If you for example want to send "Kalle" to the computer you would write:


Setting up computer
First of all, when inserting the USB to COM-adapter, Windows will not find the right driver, and will direct you to the silicon labs website. This usually works great, but if not,  here is the link to the drivers.

After installed, go to device manager and make sure it is set like this (default value i think, and mine still works if i change the "Stop bits" to one):


Now install and open "Termite.exe" and press the "Settings" button:

It will look something like this: change the "Port" to the port the computer chose for your adapter, and set it up like this: (no need to log the file, and put a timestamp, but nice features that i usually have set)


When pressing the "Log File" you get to choose where to put the logged file, and when checking the "Timestamp" you get to choose how long time every package-set is allowed to take, to still get on the same row (timestamp)...

Example:


Here i send "011" to the chip (type in the bottom row and press enter), which returns ":Sent! 1#" (which is just something the chip i have connected right now is programmed to answer when it successfully sent the package "011" to my home made IR-RF Remote control after 1 retries)


I think it is possible to use USART on a ATtiny chip as well, but haven't looked in to that yet! (if anyone has a working code for that, please share your experiences!)

Hope this is helpful... it took me a long time to find a free program like Termite that has a timestamp and a log-file option, the only thing it lacked was the TCP-server ability that mine has ;)


If you have questions i might be able to help out in the comment field =)

Monday, April 8, 2013

Tutorial - nRF24L01 and AVR

To start out with, you have to know that I am just a hobby programmer so if you find errors or possible improvements in my code, please give me a note so that I can correct them.

If you have read my last blog posts IR-RF remote control and Temperature based flow regulator you have noticed i like to add wireless control to my components. In this tutorial i will describe how i managed to get the nRF24L01 module to work with AVR microships like the Atmega88 (28pin), ATtiny26 (20pin) and ATtiny85 (8pin), since almost all of the tutorials out there are aimed at the Arduino users.

The nRF24L01 module is an awesome RF module that works on the 2,4 GHz band and is perfect for wireless communication in a house because it will penetrate even thick concrete walls. The nRF24L01 does all the hard programming fore you, and even has a function to automatically check if the transmitted data is received at the other end.
There are a couple of different versions of the nRF-family chips and they all seem to work in a similar way. I have for example used the nRF905 (433MHz) module with allmost the same code as I use on the nRF24L01 and the nRF24L01+ without any problems. These little modules has an impressive range, with some versions that manages up to 1000 m (free sight) communication and up to 2000 m with a biquad antenna.

nRF24L01 versus nRF24L01+ 
The (+) version is the new updated version of the chip and supports data rate of 1 Mbps, 2 Mbps and a "long distance mode" of 250 kbps which is very useful when you want to extend the broadcast length.
The older nRF24L01 (which i have used in my previous posts) only support 1 Mbps or 2 Mbps data rate.
Both the models are compatible with each other, as long as they are set to the same data rate. Since they both costs about the same (close to nothing) I would recommend you to buy the + version!


The module
An ebay search on "nRF24L01" shows that there are many different versions of the modules that has the nRF24L01(+), and I have read that some of them are better then others due to better grounding and so on. But if you are after the long-range ones, make sure it has the + sign, and buy one with an extended antenna like this one:


Part one - Setup
Connection differences
The nRF24L01 module has 10 connectors and the + version has 8. The  difference is that the + version instead of having two 3,3 V and two GND, have its ground (the one with a white square around it) and 3,3 V supply, next to each other. If changing module from a new + version to an old one, make sure not to forget to move the GND cable to the right place, otherwise it will shorten out your circuit.

Here is a picture of the + version (top view), where you can see all the connections labeled. The old version has two GND connections at the very top instead of at the down right corner. 

Power supply (GND & VCC)
The module has to be powered with 3,3 V and cannot be powered by a 5 V power supply! Since it takes very little current I use a linear regulator to drop the voltage down to 3,3 V.
To make things a little easier for us, the chip can handle 5 V on the i/O ports, which is nice since it would be a pain to regulate down all the i/O cables from the AVR chip.

Chip Enable (CE)
Is used when to either send the data (transmitter) or start receive data (receiver).
The CE-pin is connected to any unused i/O port on the AVR and is set as output (set bit to one in the DDx register where x is the port letter.)
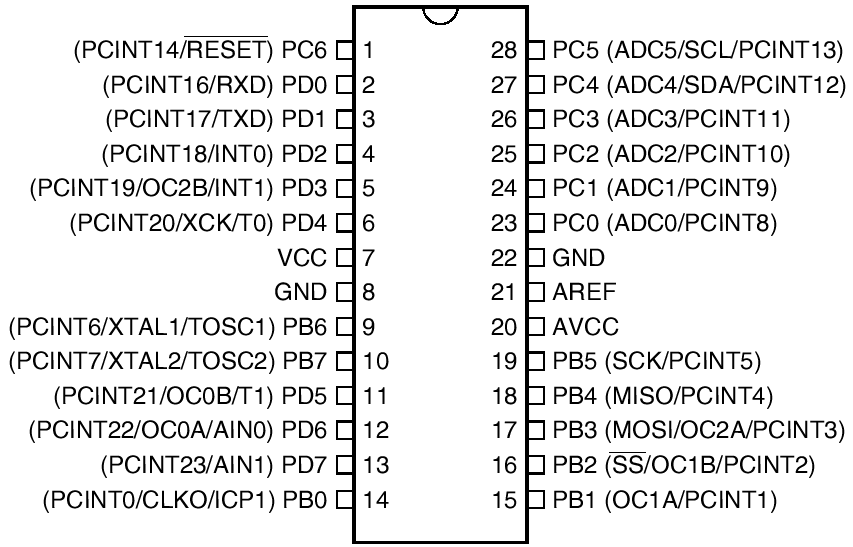
Atmega88: PB1, ATtiny26: PA0, ATtiny85: PB3


SPI Chip Select (CSN)
Also known as "Ship select not". The CSN-pin is also connected to any unused i/O port on the AVR and set to output. The CSN pin is held high at all the time except for when to send a SPI-command from the AVR to the nRF.
Atmega88: PB2, ATtiny26: PA1, ATtiny85: PB4

SPI Clock (SCK)
This is the serial clock. The SCK connects to the SCK-pin on the AVR.
Atmega88: PB5, ATtiny26: PB2, ATtiny85: PB2


SPI Master output Slave input (MOSI or MO)
This is the data line in the SPI system.
If your AVR chip supports SPI-transfere like the Atmega88, this connects to MOSI on the AVR as well and is set as output.

On AVR's that lacks SPI, like the ATtiny26 and ATtiny85 they come with USI instead, and the datasheet it says:

"The USI Three-wire mode is compliant to the Serial Peripheral Interface (SPI) mode 0 and 1, but
does not have the slave select (SS) pin functionality. However, this feature can be implemented
in software if necessary"

The "SS" refered to is the same as "CSN"
And after some research i found this blog that helped me allot.

To get the USI to SPI up and running I found out that I had to connect the MOSI pin from the nRF to the MISO pin on the AVR and set it as output.
Atmega88: PB3, ATtiny26: PB1, ATtiny85: PB1


SPI Master input Slave output (MISO or MI)
This is the data line in the SPI system.

If your AVR chip supports SPI-transfere like the Atmega88, this connects to MISO on the AVR and this one stays as an input.

To get it working on the ATtiny26 and ATtiny85, i had to use USI as mentioned above. This only worked when I connected the MISO pin on the nRF to the MOSI pin on the AVR and set it as input and enable internal pullup.
Atmega88: PB4, ATtiny26: PB0, ATtiny85: PB0


Interrupt Request (IRQ)
The IRQ pin is not necessary, but a great way of knowing when something has happened to the nRF. you can for example tell the nRF to set set the IRQ high when a package is received, or when a successful transmission is completed. Very useful!

If your AVR has more than 8 pins and an available interrupt-pin i would highly suggest you to connect the IRQ to that one and setup an interrupt request.
Atmega88: PD2, ATtiny26: PB6, ATtiny85: -


Part two- Programming
Here i will explain the c-program that runs on the AVR-chip. You can find a working copy of my code here (easier to copy and paste from).

Includes
I have included these lines to get my code to work:


You can see that i am importing a file called nRF24L01.h. This is a small library that defines the registers of the nRF so that i for example can call register "STATUS" instead of the register "0x07"... Just copy the text in the link and paste it into a file that you name "nRF24L01.h" and put it in the root of your folder.

Defines
To make the code cleaner i also put these definitions in the "nRF24L01.h"-file:


And also add the defines:
#define W 1
#define R  0


SPI
Initialization
The nRF chip communicates with the AVR-chip using SPI which has to be initialized in the AVR according to its datasheet. Here is the initializing code for Atmega88:


ATtiny26:


ATtiny85:


Communication
Now to send and receive a byte from the nRF with the SPI all you have to do is to use this function:
Atmega88 (SPI):
ATtiny(26 & 85) (USI as SPI):


I don't think it matters if you send a char or an integer, this is just how i got it to work... Note that these functions always returns something, this returned message is only cared fore when reading data from the nRF (a more appropriate name of the function might be "Write_Read_Byte_SPI").

nRF24L01(+) communication
Now to the fun part...

How it works
1) The nRF starts listening for commands when the CSN-pin goes low.
2) after a delay of 10us it accepts a single byte through SPI, which tells the nRF which bytes you want to read/write to, and if you want to read or write to it.
3) a 10us delay later it then accepts further bytes which is either written to the above specified register, or a number of dummy bytes (that tells the nRF how many bytes you want to read out)
4) when finished close the connection by setting CSN to high again.

Reading bytes from nRF
To start off, make sure your SPI communication is working by reading out something from the nRF. Reading a register on the nRF is accomplished by this function: (all of my example codes is for Atmega88, just change to the right port and pin number for the CSN and CE to get it to work on ATtiny as well)


I recommend you to start out by reading the STATUS register like this:

USART
If you have an AVR that supports USART like the Atmega88, i highly recommend you to use that as a way of sending the data back to the computer with this little friend... (I have written a small tutorial in the subject)


This is done simply by calling the function like this:


If you like me have a function called "USART_Transmit(uint8_t data)"
The usart should send 0b00001110 (or 0x0E) to the computer since it is the preset configuration of the STATUS registry (see the end of this blogpost).

LED
If you are using an ATtiny it lacks the USART and thereby the ability to write things back to the computer, then you can use a more hardcore way using an LED to turn on if the STATUS register is set correctly. Since the bites in the STATUS (0x07) register are preset to 0b00001110 (or 0x0E) you can test if this is true by this function:


Make sure you remember to first set the LED-pin to output: DDRB |=(1<<5);

If you are using an 8-pin ATtiny like the ATtiny85, there is not a single free pin on the chip to put the LED on, so i think a good idea would be to use the MISO-pin as a temporary LED output (since it is an output already and the SPI is not in use at the moment). Attach the LED to the PB1 and via a resistor to GND, then in the if-function above change the port number to 1. I haven't tested this my selves but i doubt it would cause any problem to the SPI-connection.

Writing bytes to the nRF
Now it's time to send a command to the nRF, this is done almost the exact same way as the reading command with this function:


If the register holds more then one byte, the TX_ADDR-byte for example holds five bytes, then you have to send them one at a time after each other with 10us delay in between. This makes the function a bit more complicated since C-code is unwilling to pas arrays of integers into functions as is.

I also wanted to clean up my code a bit, so I decided to make one function that I can use to both read and write to the nRF. The function should also accept an array of integers and be able to return an array of integers. This is the result:


The most confusing thing whit this function is the W_TX_PAYLOAD in the if-statement... The thing is that when you want to write bytes to the W_TX_PAYLOAD you cannot add the W_REGISTER as you normally does when you want to write to a register. Have a look at the registry setup at the very bottom of this blog post, and you will see that the W_REGISTER and the W_TX_PAYLOAD is in the same "top level" of the registers. The same goes for the TX_FLUSH registers...

Now here is some examples that shows how to use the function:


To come back to the W_TX_PAYLOAD, when you want to ad the payload to the nRF, you simply use the "R" instead of the "W" to trick the WeiteToNrf-function to not add the W_REGISTER.

Setting up nRF24L01(+) 
Now it is time to setup the nRF for your specifications. In the example codes, I will send a 5 byte payload with the nRF. This is easily changed to a 1-32 byte payload by changing a bit in the initialization step of the nRF (see below)... This is how i usually set it up for simple communication between two nRF's:


In the code above, i missed a very important setting (if using EN_AA) that sets the number of retries and the retry delay like this:


Add these lines in the function above to set the number of retries to 15 and the delay to 750us... the delay has to be greater than 500us if you are in the 250kbps mode, or if the payload is greater than 5bytes when in 1Mbps-mode or a payload greater then 15bytes when in 2Mbps mode. Note that the default value of this is only 250us, and will therefore cause trouble when in 250kbps mode and with bigger payloads!

As you can see i decided to make it a transmitter this time. This is easily changed in the code by first delay 50ms, to make sure the nRF is in sleep mode, then send 0x1F to the CONFIG register, than make it wait 50ms again before the first receive-command.

Transmit data
When in transmitting mode this is the function that sends your payload:


And you call the transmit function like this: (now i just send 0x93 five times in a row, you can fill the array with any bytes you want to send)


Receive data
When in receiver mode this is the function that listens and receives your data:


 After every received/transmitted payload the IRQ's in the nRF has to be reset in order to receive/transmit next package. This is done like this:


Verify transmitted/received data using Interrupt
If you have more than an 8-pin AVR, I say use an interrupt to get triggered when data is successfully received or transmitted. INT0 interrupt is setup like this:

First you have to initialize the interrupt like this on Atmega88:


And initialization on ATtiny26:


Interrupt caused when receiving data
Setup a function triggered by the corresponding vector (INT0) at the very bottom of your code like this: (the global array "*data" is at the very top of my code...) And here i use it to send the received payload to the computer by usart:


Interrupt caused on transmission success
Use the same interrupt function when transmitting data but change its content to just flash the LED to tell you that transmission completed, or you can tell the nRF to switch for a receiver, if what you just sent was a question to a receiver that in turn changed to a transmitter to return your call.

When you use interrupt, it is crucial that you enables the external interrupts by the command sei(); This should be done before the receive_payload, and transmit_payload is used.

Verify transmitted received data without interrupt
If your chip lacks interrupt or if you ran out of free interrupt pins, you can manually check if the IRQ-flags are set in the status register after every time you either transmit data, or run the receive_payload function (before the reset function!!!)

Transmitting
The easiest when you want to see if transmission succeeded or failed, is to check if the MAX_RT is set which mean it failed. This is done like this:


Then you know you have to resend the package.... i usually put this statement in a while loop that loops untill the package is received!

Receiving
Do the same check to see if no data is received by checking the RX_DR-bit (data-ready) like this:


Or it might be a better idea to check if data is received by changing "!=" to "==", if not, you start the receive_payload function again!

Code overview


If you are using the devise as a transmitter, I usually have an USART-interrupt function called "ISR(USART_RX_vect)" at the very bottom that triggers when the computer sends something to the microchip. In the usart interrupt vector it then calls transmit_payload with the data received from the usart.

If you don't use usart, in the main while loop, send the data as described above "Transmit data".

If you don't use the  INT0-interrupt to check if the transmission succeeded  put an if-statement in the main while loop to check whether the correct IRQ flag (nr 4) in the STATUS register is cleared as described earlier.

If your chip is in receiver mode, in the main while loop, i usually call:
while(1)
{
       reset();
       receive_payload();
}

And if i don't have an interrupt, followed by an if-statement to see if anything was received by checking if the correct IRQ flag (nr 6) is set!

Long range mode
If you have the + version, than you can set the RF_SETUP byte to 0x27 instead of 0x07, which will enable the 250 kbps mode (long range) on full power, and i also recommend you to read this tutorial on how to build an amplifying biquad antenna. (remember to set the EN_AA-delay to at least 500us as described above)

Registers
This is straight from the datashet of the older version of the nRF24L01 (i find it easier to read thean the + version)

This is the layout of the "top level" registers as i call them:


And here are all the other registers and there configurations:


I hope you enjoyed my tutorial...
as always, if there is questions there might be an answer in the comment field.
/Kalle